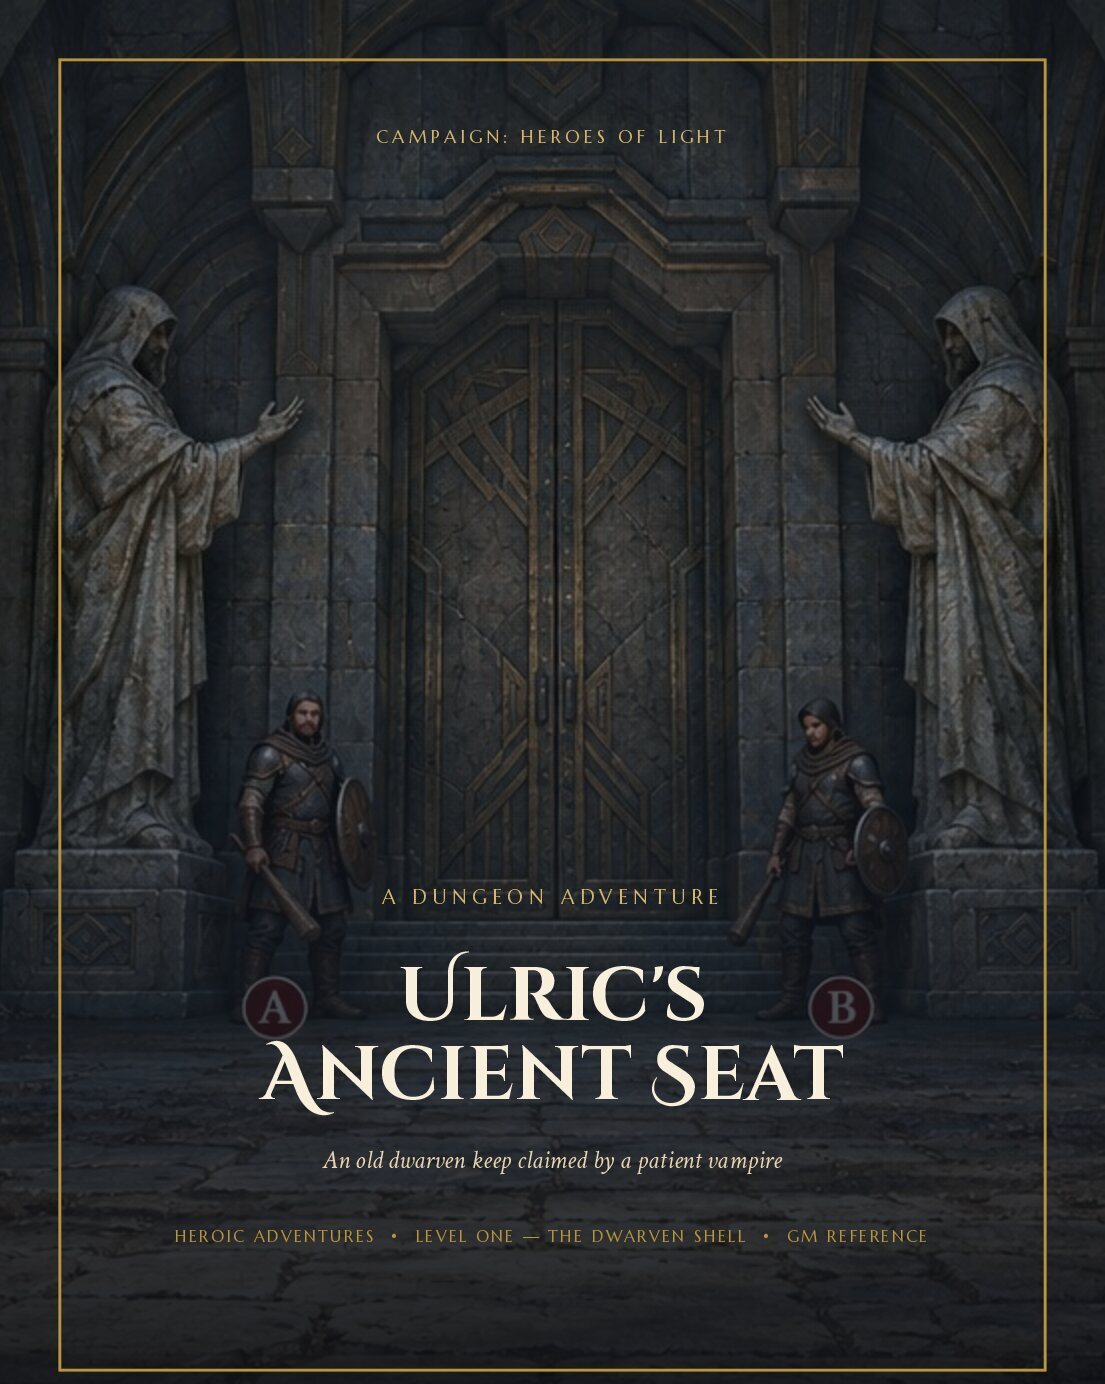
An old ancient dungeon that Ulric has recently moved into and is actively working from. The party is about to enter it.
Location. Foothills west of Silvereth, tucked into a fold of rock where the trees grow too straight and too still. Half a day's hard march from the nearest road. It sits in the region near the party's holding and Baron Kell's manor — the room behind Ulric in the glass shard has dark paneling, one candle, and a window looking out at a hill with a single watchtower (default: Kell's manor hill).
Entrance. A dwarven archway cut into living stone. Eight hundred years old, not a crack in it.
Ulric is using this place as his base of operations for expanding his influence: taking over nearby villages and converting their leaders. Every village that falls gives him more thralls, more eyes, more leverage over the region between the party's keep and Silvereth.
Intended structure
Entrance / approach. The dwarven archway and Gate Hall — how the party finds the keep, and what the surface looks like.
Upper levels (Level One — The Dwarven Shell). Village-conversion infrastructure — converted leaders held or housed here, records of which villages have fallen, tribute flows. Fully keyed in this module.
Mid levels. Ulric's personal quarters (dark paneling, candle, window with the keep's watchtower view), the other half of the glass shard, feeding chambers. To be fleshed out as needed.
Deep levels. Lumel's influence — mirror fragments, ash like the well mark, anything that echoes the Tower of Lumelel. The vault behind the runed door is intentionally left blank — that is the mystery.
Chapter II
Layered Backstory
Layer One — The Dwarves (Clan Vharruk)
Around eight hundred years ago, Clan Vharruk delved this keep as a waystation and armory on the old northern trade route between the lowlands and the northern passes. When the route shifted south, they abandoned it — sealing the deep vaults behind a runed door they never meant to reopen. The runes still hum faintly if you press your ear to the stone. Dwarven stonework doesn't weather. It just waits.
Layer Two — The Whispering Dark
A century later, a cult of human renegades calling themselves the Whispering Dark moved in and used the sealed vaults for their rituals. They left behind the glass shards — thin panes of black crystal that catch light wrong, bending it into the keep's upper halls. When the cult collapsed, the shards remained, and whatever they were for was never finished.
Layer Three — Ulric
Most recently, Ulric (also known in court records as Ulrin Halemdrel — use Ulric at the table unless a courtly context needs the full name) pushed out whatever was left and made it his base of operations. He doesn't need fancy shards to bend people to his will. He's a vampire. He turns them into thralls, or he casts domination spells directly. Slow, quiet, and deniable.
Chapter III
Ulric's Role & Ambitions
Who he is
Ulrin Halemdrel in the Tower notes — the king's cousin who killed Harlina and escaped. Avalryn has put up to 5,000 coin on his capture or reliable intel on his Krimkar ties.
He is Lumel's instrument. His master's errand: keep the road holdings soft for Lumel. He never says the name.
He is patient and careful, which makes him worse than a rushing threat. He wants the lords out of the keep. An empty keep is easy work.
He has already fed lightly on the poisoner courier — two small healed bite marks on the inner wrist. The man is half under his control and more afraid of Ulric than of the lords.
What he's been doing
Village conversions. Ulric has been moving through nearby villages, turning their leaders — mayors, headmen, priests, whoever holds local authority. Each converted leader becomes a quiet asset: taxes redirected, travelers watched, reports sent back through the network.
Intelligence gathering on the party. The poisoner was ordered to live on the holding, learn the keep, count fighters, learn the lords' habits, and report through the glass shard at midnight. The check-in phrase is “The hearth is warm”; the duress signal is “The hearth is lit.”
Cultivating Baron Kell. Not with offers — with silence. Kell is nervous about the holding's expansion (75 acres bought from a dead landowner's heirs). Ulric feeds that resentment. Kell attends feasts, smiles, counts fences. The kind of man a vampire finds useful because he's afraid and doesn't know it yet. A “relation of the royal house” from Silvereth has been a guest at Kell's table.
The glass shard. One half of a broken mirror from Lumel's Gallery of Mirrors. Silvered backing, engraved frame pattern matches the tower mirrors (Intelligence check, difficulty 13, for anyone who was in the Gallery). It only works when someone is present and looking into both halves at once. It wakes at midnight for roughly as long as a candle burns a finger's width. Drokin's vampire sense prickles a minute before it wakes.
The village takeover pattern
A village starts losing people — hunters who don't come back, travelers who pass through and are never seen again.
A few survivors return changed. Quieter. Obedient. They speak well of the new “protector” who has taken up residence in the old dwarven keep.
Trade routes quietly reroute around the village. Outsiders stop coming. The village stops asking questions.
Within a season, the village is his — a source of food, coin, and more thralls.
He doesn't conquer. He absorbs. Each village becomes a spoke in a wheel with his keep at the hub.
Chapter IV
Threats Already Delivered
From the midnight check-in scene (Session: Three Roads from the Keep):
“Drokin. You look well, for a man who drank what you drank.”
“You have something of mine in your cellar. He knows very little. That's why I chose him.”
Bargain: “Go west. Save your swamp town. You have my word that I will not lay a hand on anyone on your land while you're gone.” — technically true; Kell's men or a thrall would do it, not Ulric.
Trade offer: true things about the orc army, or “Ask Baron Kell who sat at his table last night,” in exchange for the poisoner walking out the gate.
The Lumel hint: “The one I serve remembers you from the northern hills. He asked me to say so.” No name given.
Threat, quietly, only if they push: he names a child. “Little Odo Voss. Four, isn't he?”
Chapter V
Forces of the Seat
Thralls
Dominated villagers and travelers. They keep their faces and their voices but not their wills. They patrol the outer halls, tend the surface-level work, and watch the roads. They don't remember being taken.
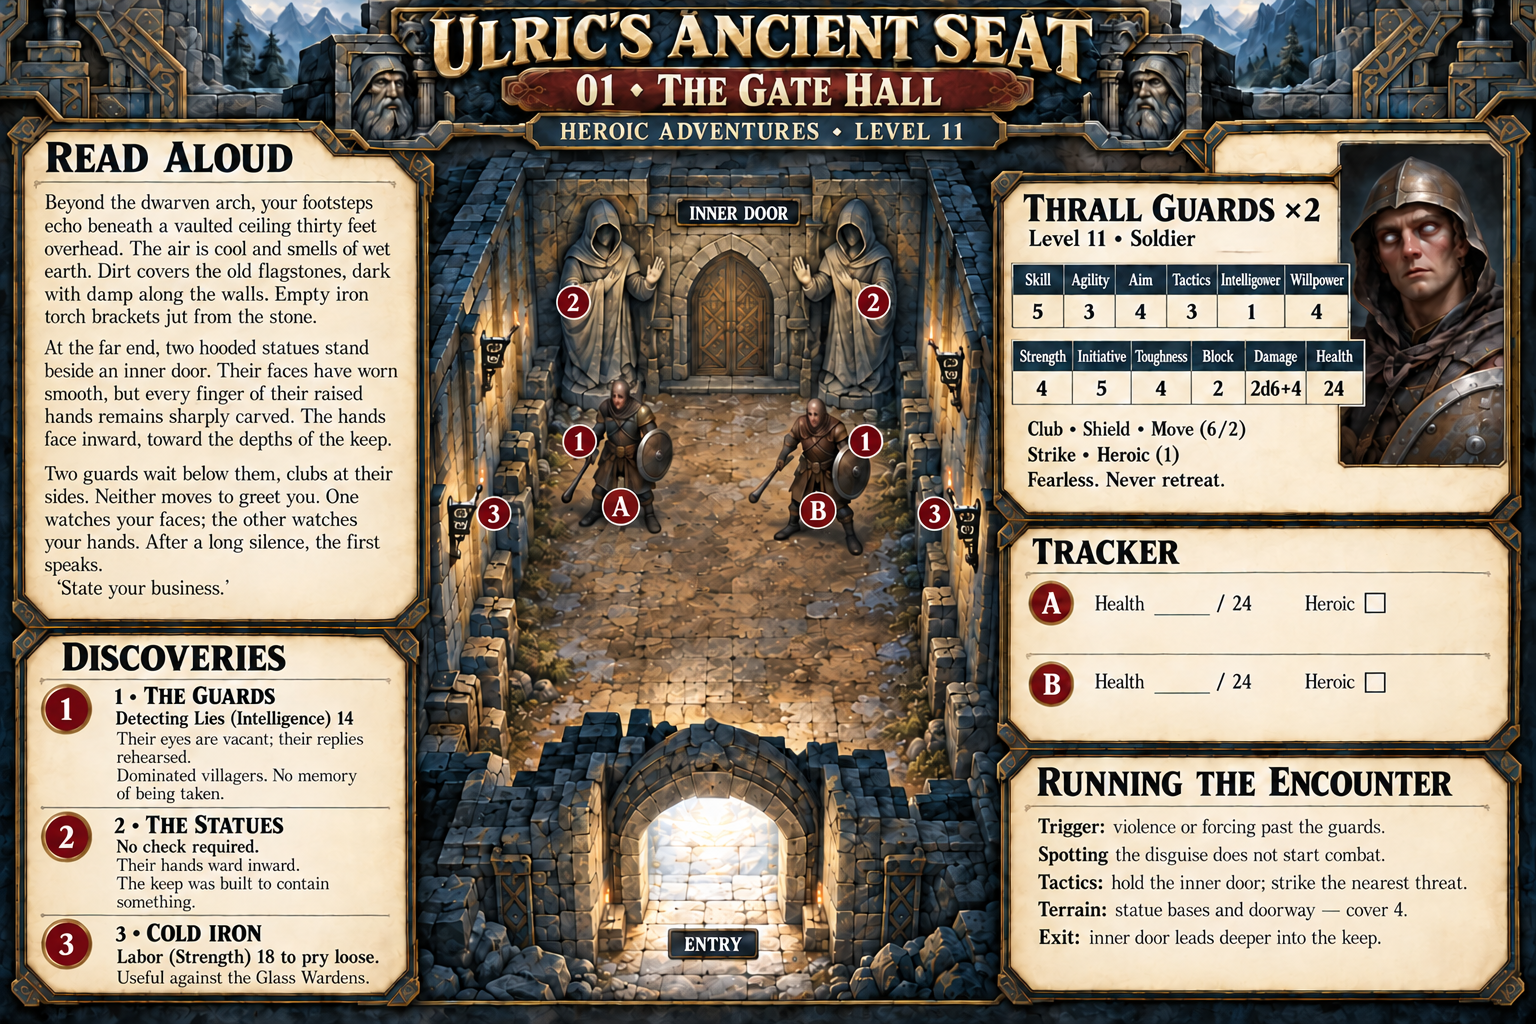
Club, shield, Move (6/2), Strike, Heroic (1). Fearless. Never retreat. Immune to being frightened. Don't remember being taken — no morale checks; fight until destroyed.
The Glass Wardens
Remnants of the Whispering Dark cult — cultists who survived the collapse and were either turned by Ulric or bound to the shards. They move through the upper halls where the black crystal bends light, and they are hard to see until it's too late.
Glass Warden
Level 11 · Slayer · Heroic Adventures room sheets
Skill
7
Agility
7
Aim
4
Tactics
5
Intelligence
2
Willpower
2
Strength
5
Initiative
11
Toughness
3
Block
0
Damage
2d10+5
Health
21
Shard blade, Move (6/2), Strike, Heroic (1).
Shifting Light. Teleport up to 6 spaces between crystal-lit spaces.
Blurred Form. Advantage on Agility defense in crystal light; negated by direct light on the Warden.
Cold Iron. A salvaged bracket deals 1d6 + Strength and ignores Blurred Form.
Named lieutenants
To be filled in.
One surface-level commander who handles village logistics.
One vault-level keeper who tends the sealed dwarven door and whatever's behind it.
Ulric — final confrontation · stats TBD
Vampire lord. Domination gaze (DC 17 Wis save), thrall-turning bite, and spellcasting — as written in the dungeon detail notes; full Heroic Adventures conversion is not yet written. Don't run him as a straight fight — he wants the party alive enough to dominate. He is a survivor: he killed Harlina and walked away from Avalryn's court. He'll bargain, flee, or send thralls first.
Chapter VI
Level One — The Dwarven Shell
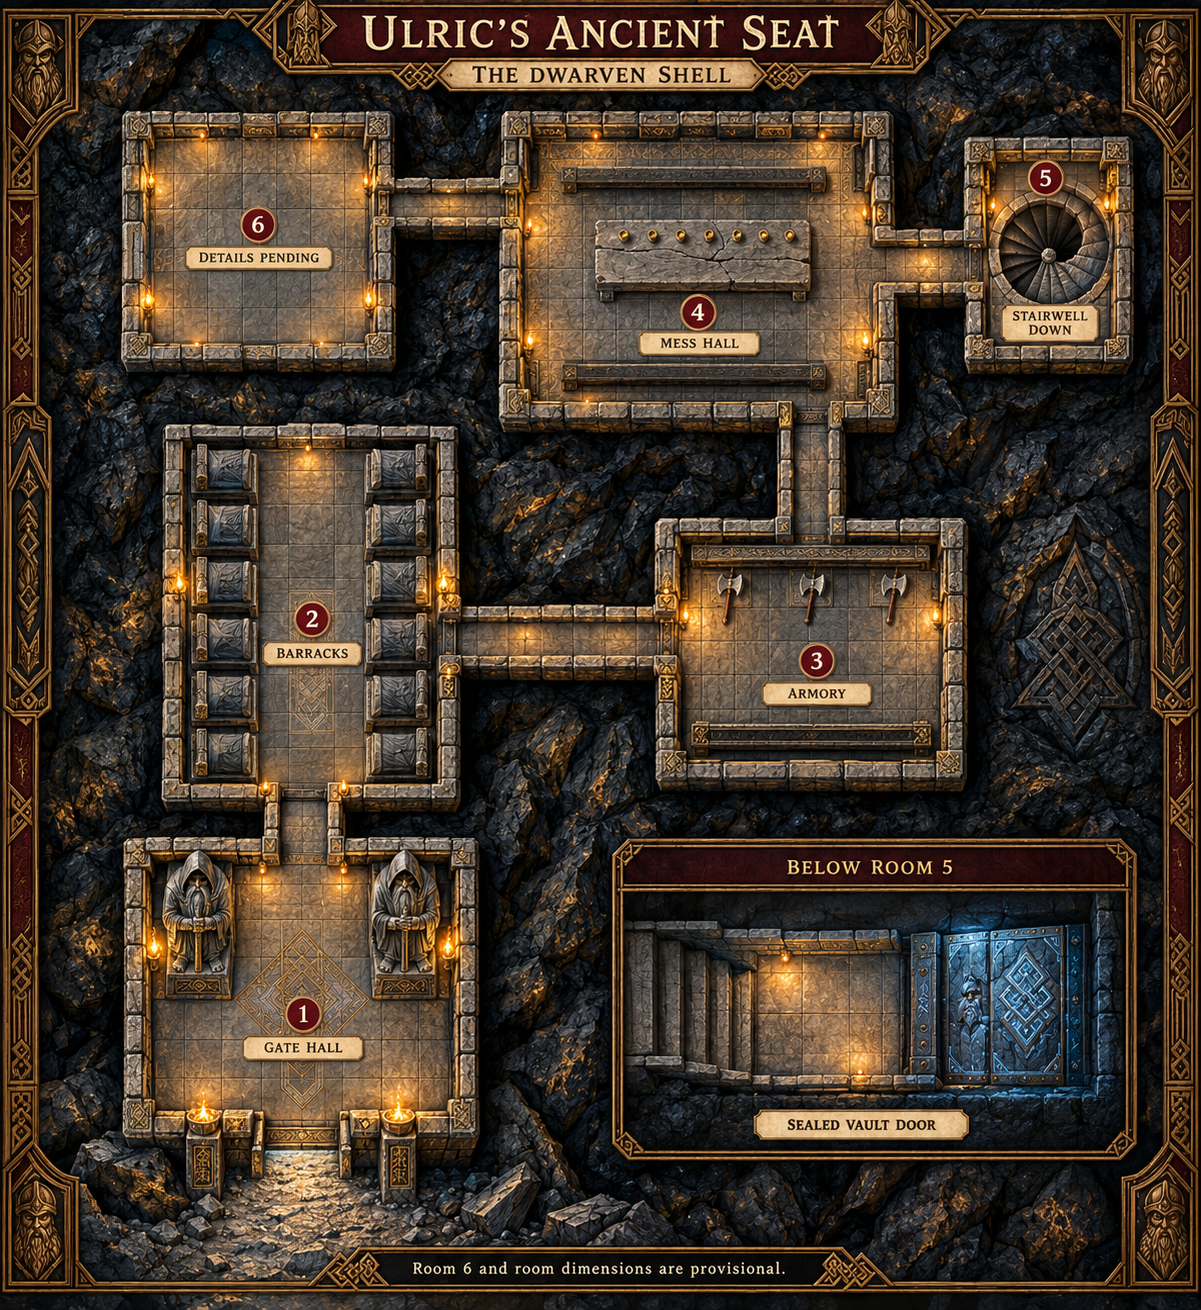
The Mess Hall branches toward Rooms 5 and 6. All connections below are bidirectional. The full Level One map follows.
Room
Connections
1 — Gate Hall
Outside; Room 2
2 — Barracks
Room 1; Room 3
3 — Armory Vestibule
Room 2; Room 4
4 — Mess Hall
Room 3; Room 5; Room 6
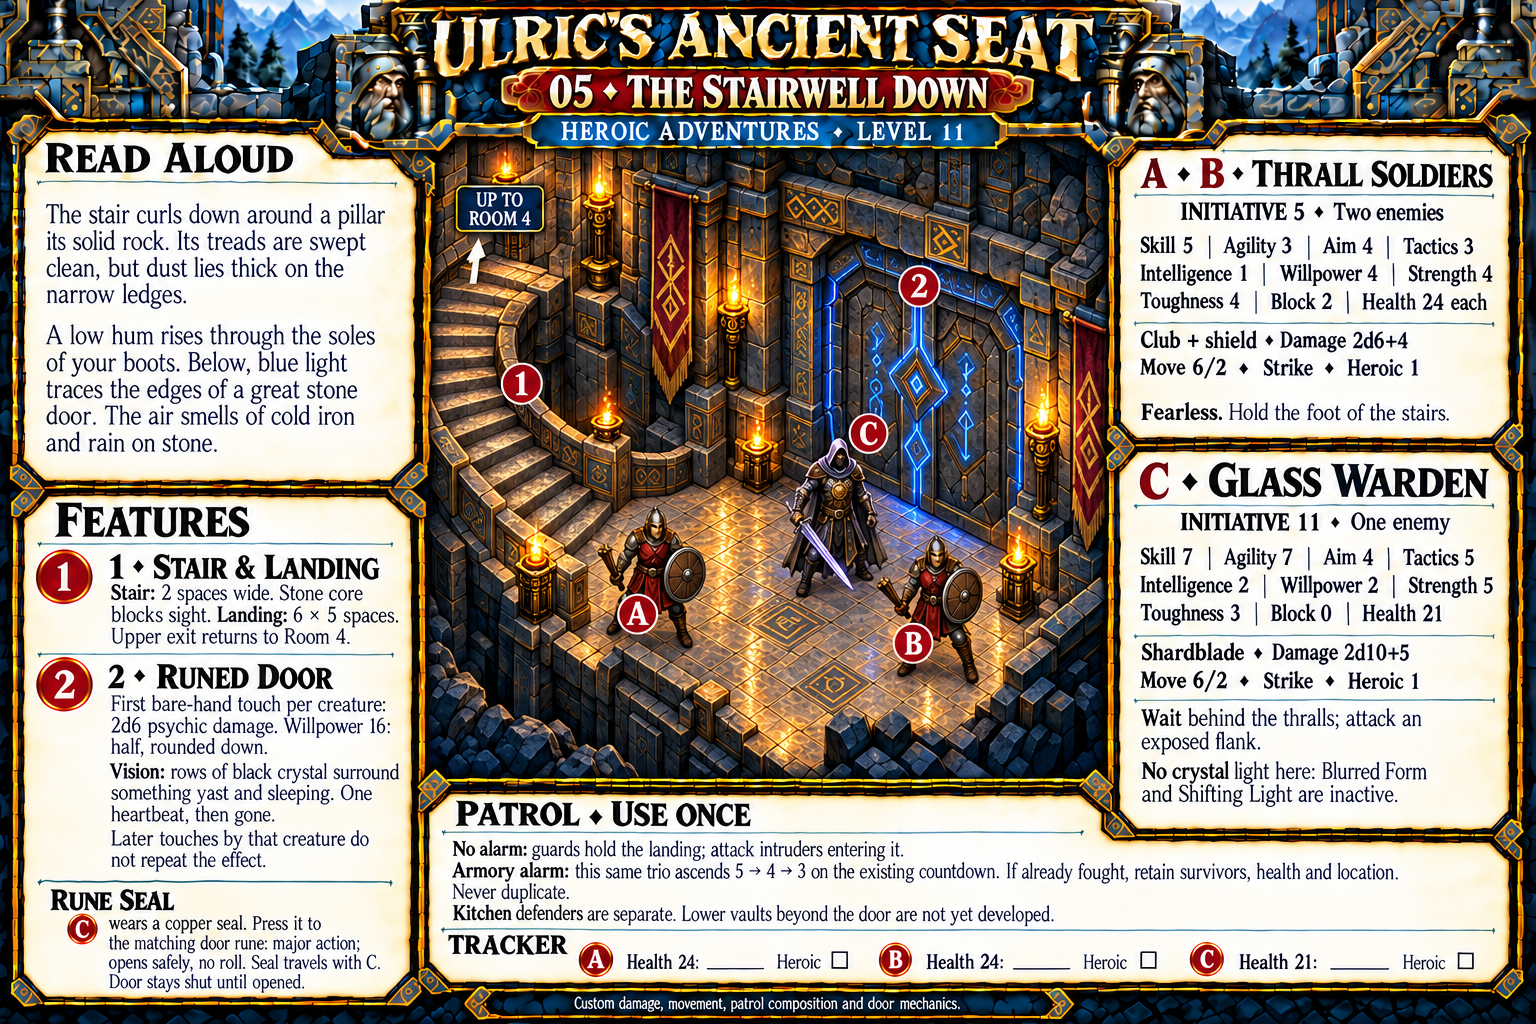
5 — Stairwell Down
Room 4; sealed vault door below
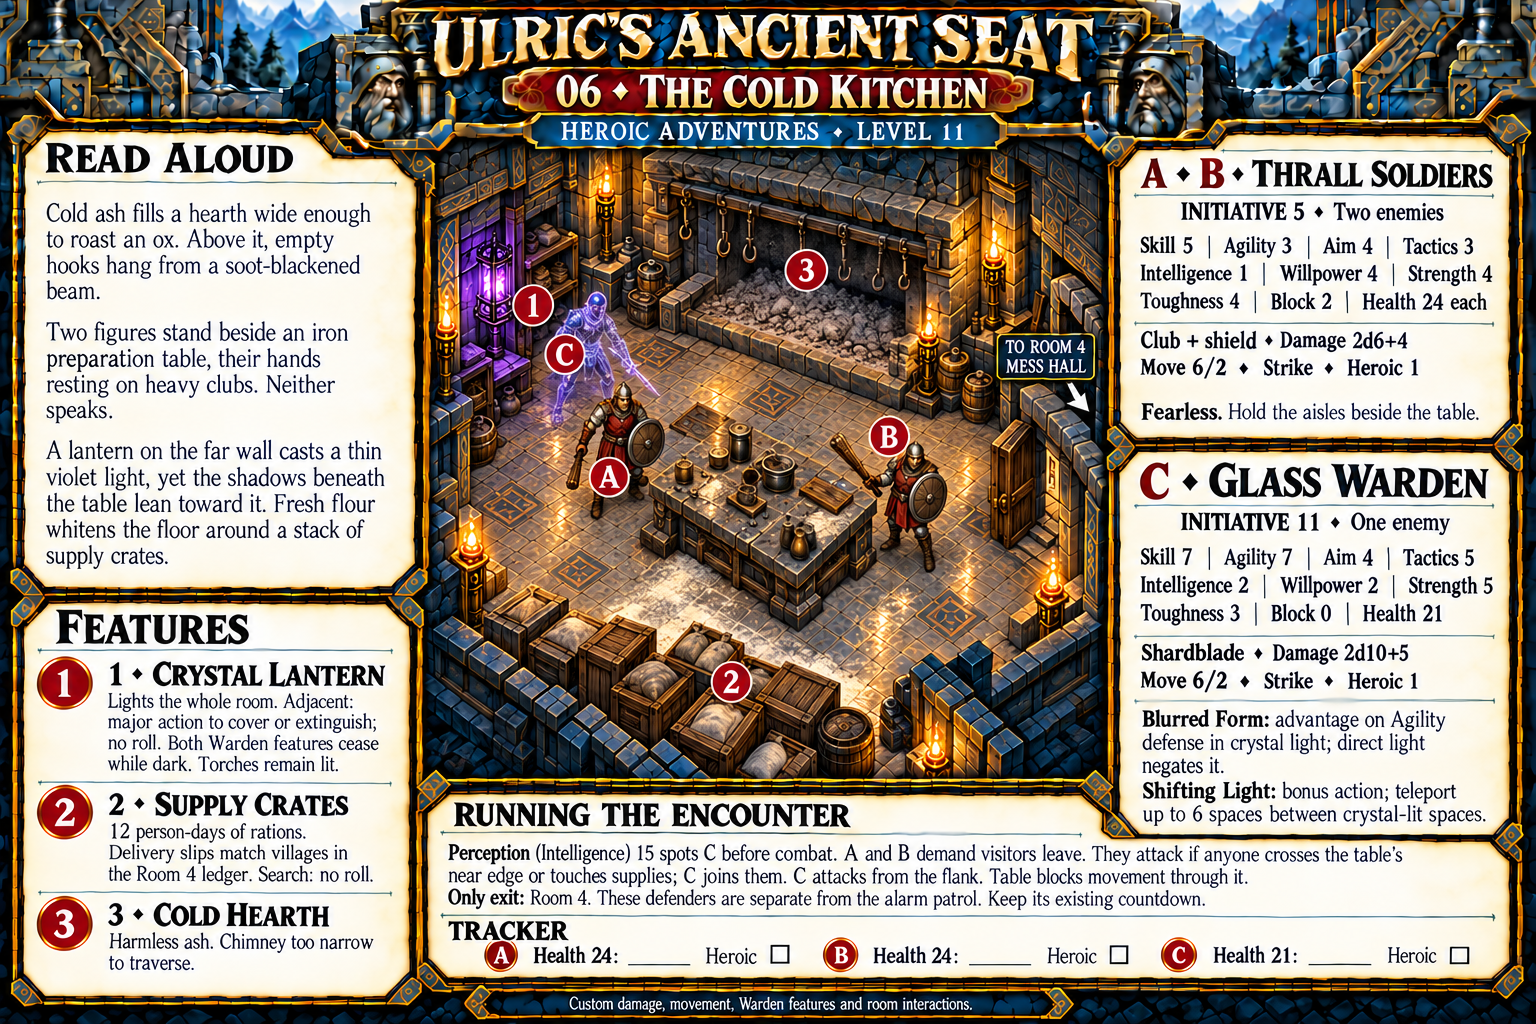
6 — The Cold Kitchen
Room 4
Map & patrol continuity
Room 4 branch. The low, unlocked rear-left door leads through a narrow passage to Room 6 (The Cold Kitchen). It does not connect to the Barracks. Room 6's only traversable exit returns to Room 4; the narrow chimney is not a passage.
Player choices. From the Mess Hall, descend through Room 5, explore Room 6, or return through the Armory. The cup puzzle does not lock any exit.
Patrol continuity. If the Armory alarm sounds, its existing countdown continues regardless of route. The response comes up Room 5 into Room 4, then toward Room 3. Track the same patrol; do not spawn another copy because the party changes rooms. Kitchen defenders in Room 6 are separate.
Map correction. Remove the former Rooms 2–4 shortcut. Room 2 has only its Room 1 and Room 3 exits. On the Room 4 DM reference, the former Room 2 exit is Room 6. The overview map art may still label Room 6 as provisional.
Level One — the Dwarven Shell
Room 01
The Gate Hall
Exits: Outside · Room 2Encounter: 2 Thrall Guards
Read aloud
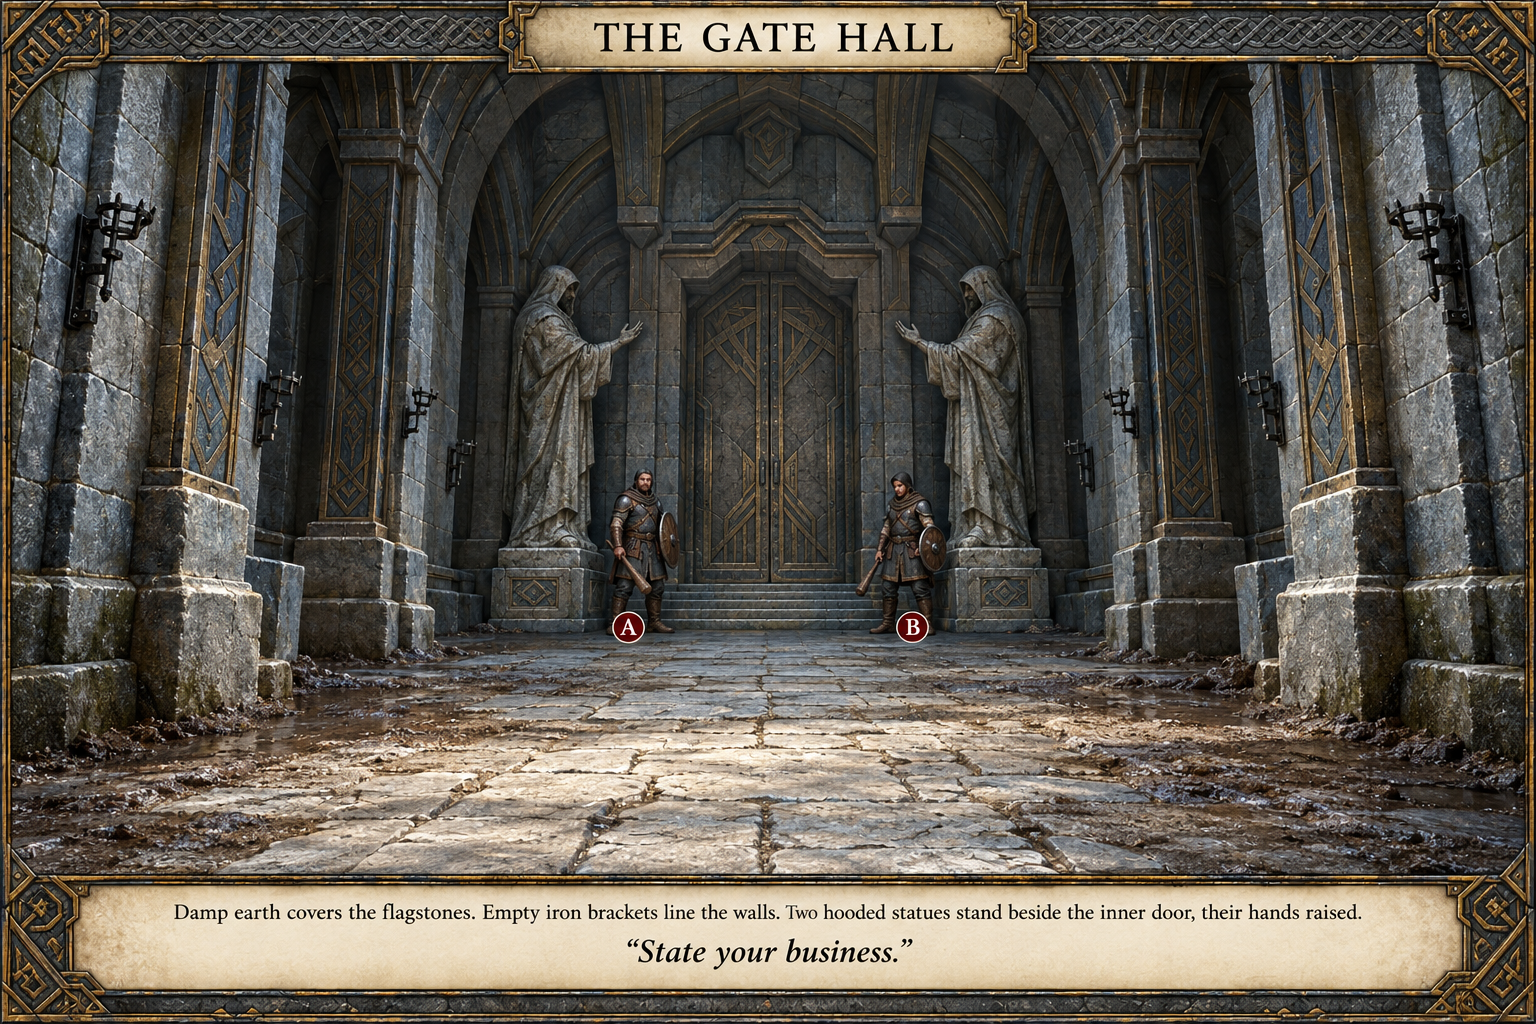
Thirty feet of vaulted ceiling. Torch sconces still holding cold iron brackets the dwarves forged. Two statues flank the inner door — hooded figures, faces worn smooth by time, but their hands are raised in a warding gesture that points inward, not outward.
At the table
Scene. Dwarven gate hall. Packed earth over flagstone; darker along the walls from winter seepage.
Guards. Two dominated villagers/travelers pretending to be ordinary guards. Faces and voices intact; wills gone; no memory of being taken.
Detect the disguise. Detecting Lies (Intelligence) 14. Failed check does not start combat.
Combat trigger. Violence or forcing past. Spotting the disguise alone does not start combat.
Statues. Hands point inward — built to keep something in. No check specified.
Salvage. Labor (Strength) 18 for cold iron brackets (ignores Glass Warden Blurred Form).
Illumination. Torches may or may not be lit — decide before play.
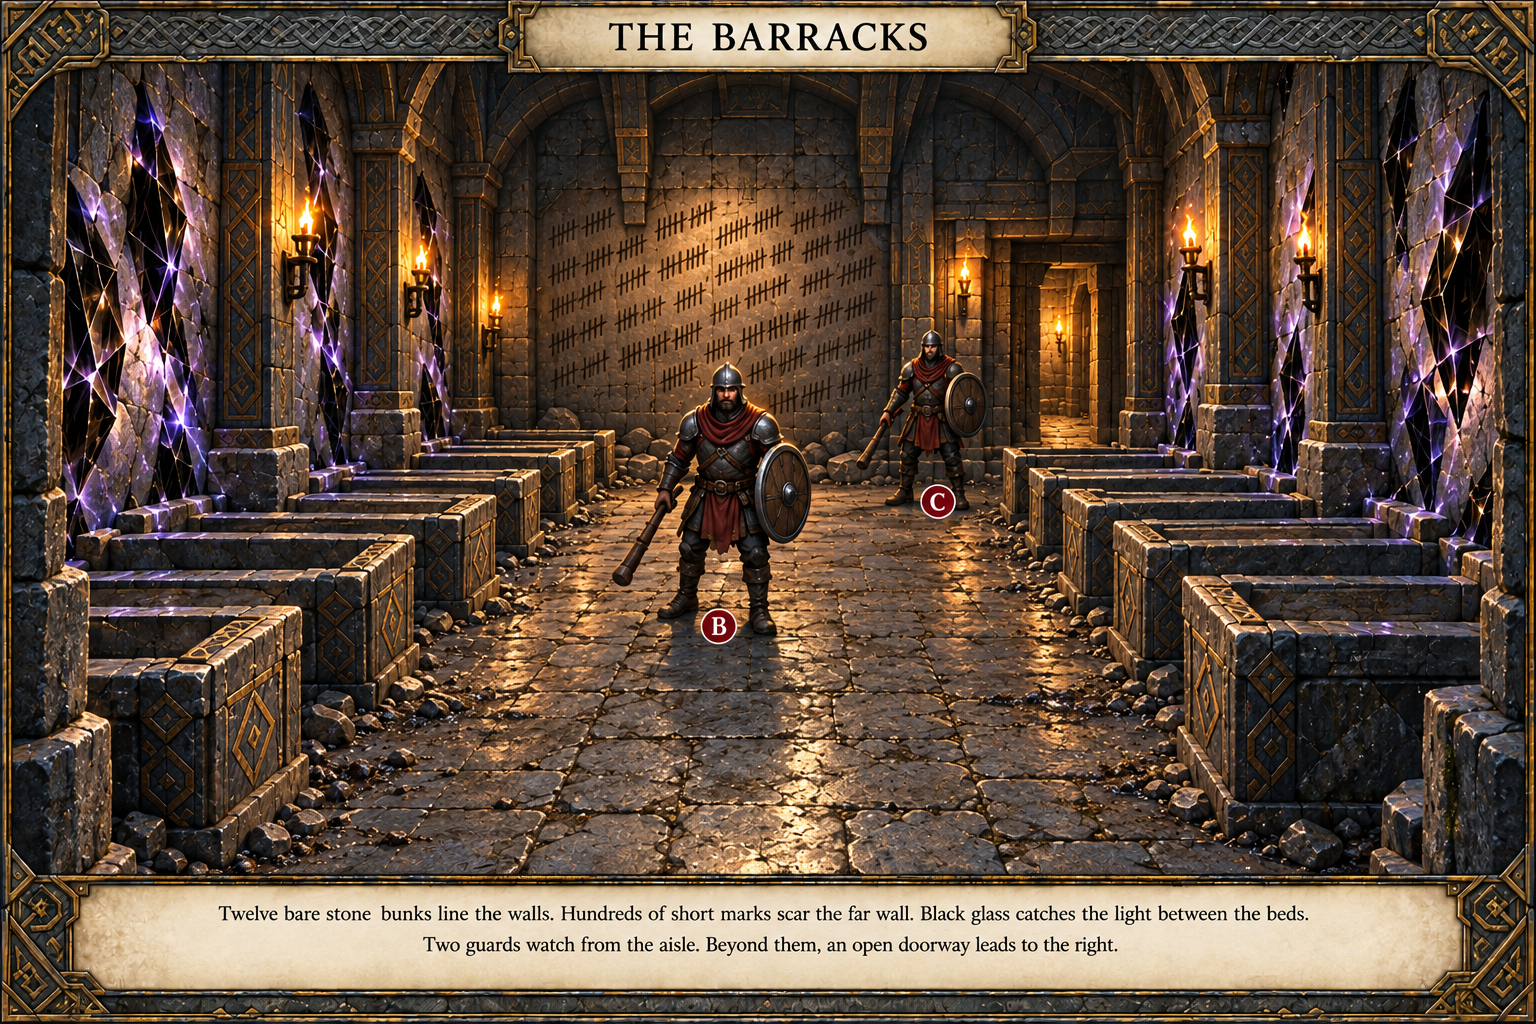
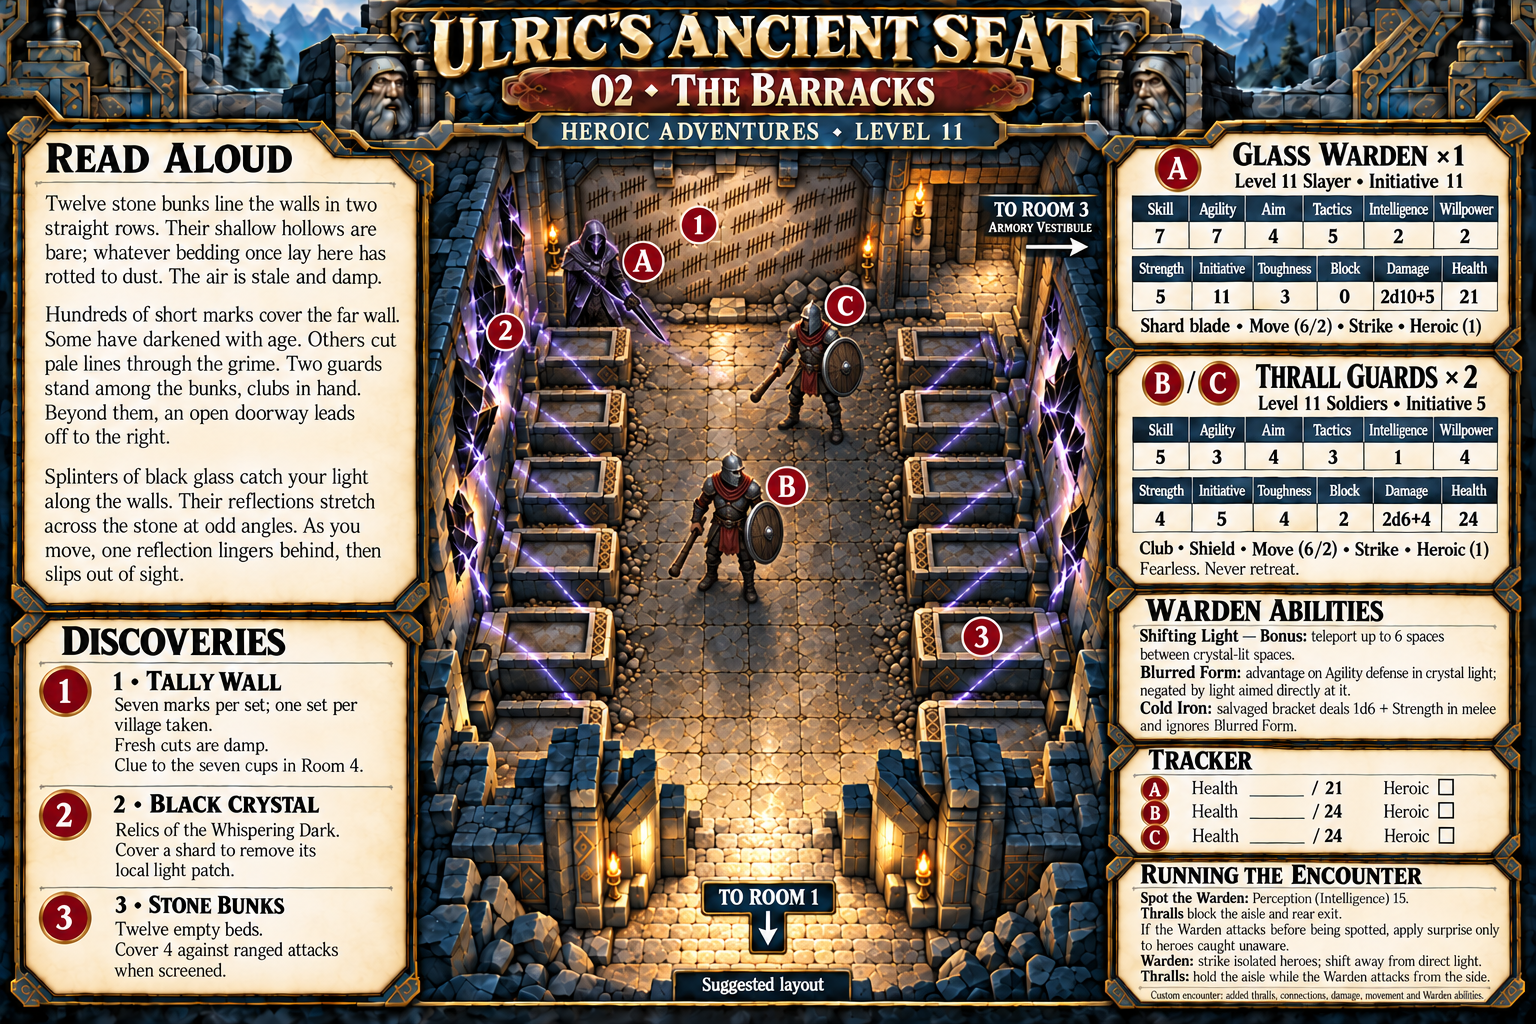
Bunks carved from the same stone as the walls. Twelve of them, in two rows. No mattresses — just hollows where they rotted away. On the back wall, tally marks scratched in sets of seven. Hundreds of them.
DM notes
Tally marks are not dwarven work — cultist or thrall. Seven marks per set; one set per village absorbed. Fresh scratches are still damp; the marks are still being added. The tally wall also hints at the cup puzzle in Room 4.
Black crystal. Relics of the Whispering Dark. Covering a shard removes its local light patch (and limits Shifting Light).
Encounter. A Glass Warden is half-seen among the bunks where black crystal light bends. Intelligence (Perception) 15 to spot it before it attacks. It uses the crystal to appear and vanish between bunks. Two thrall guards hold the aisle.
Stone bunks. Provide cover 4 against ranged attacks.
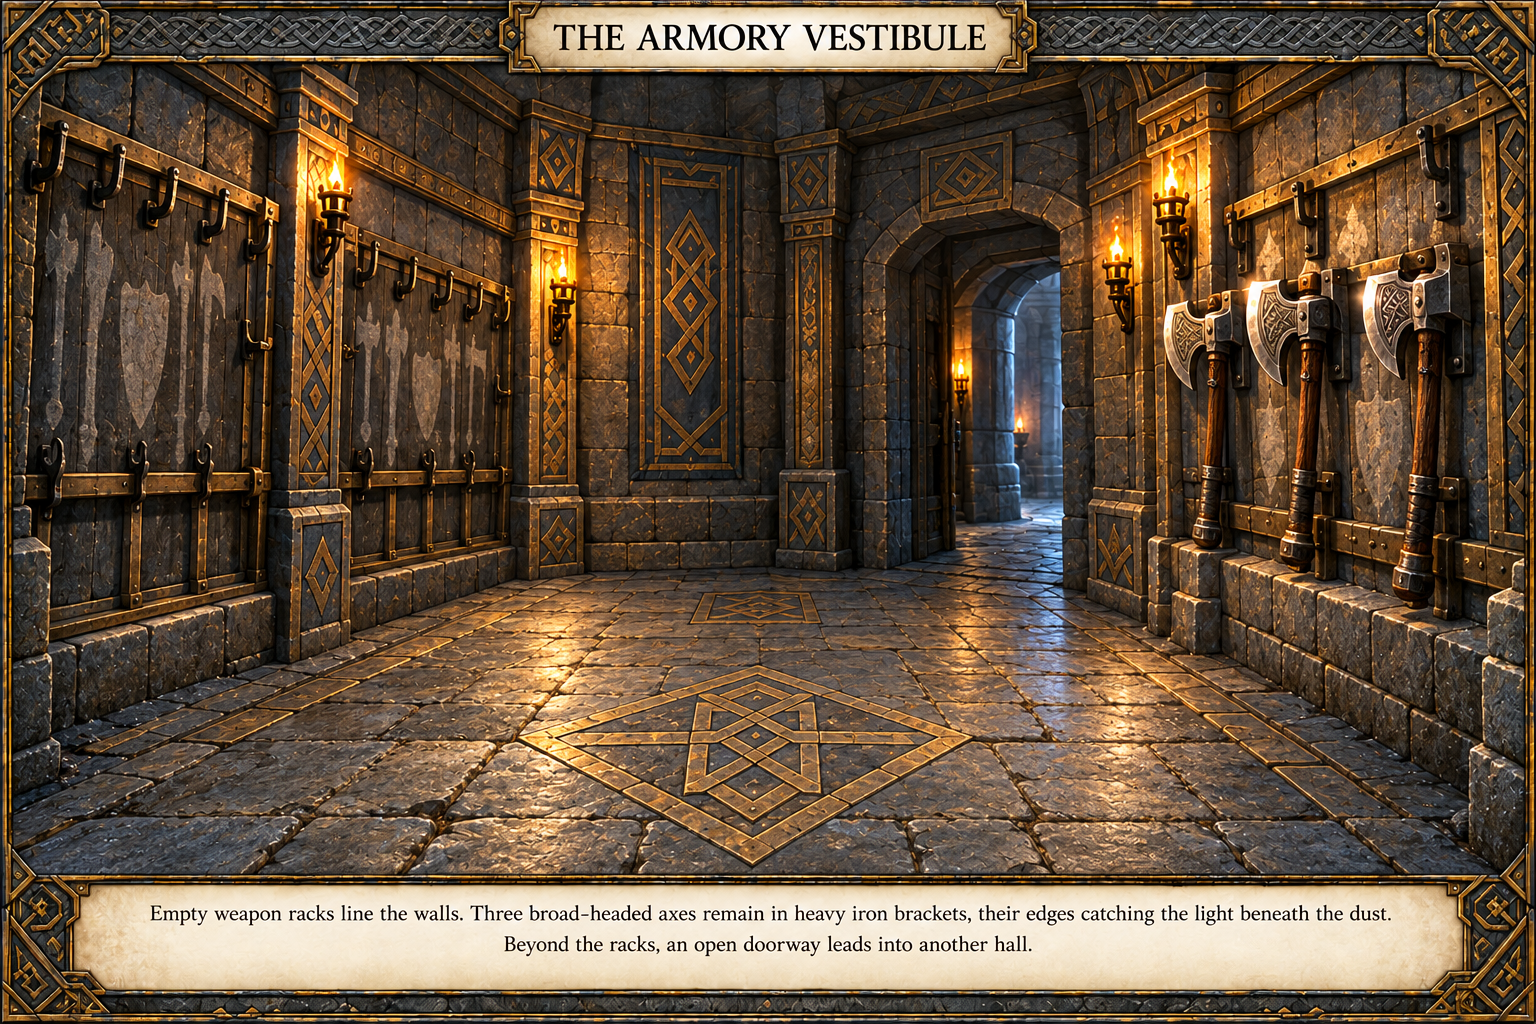
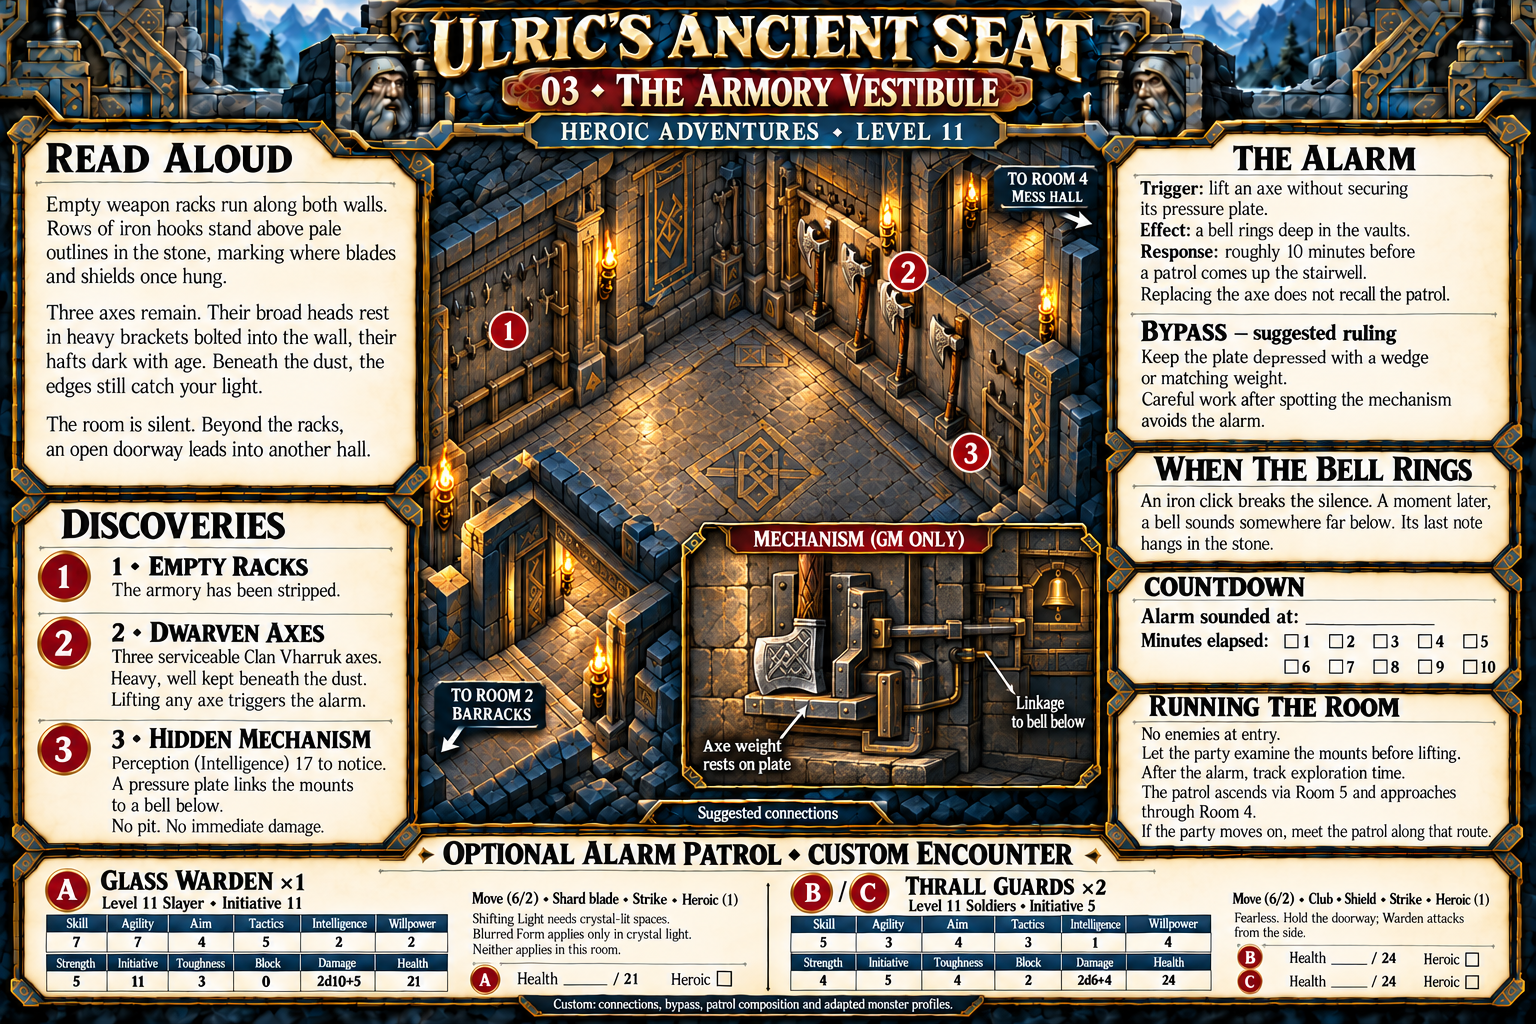
Racks along both walls where weapons once hung. Empty now — except three dwarven axes still bolted to the stone.
DM notes
Axes are serviceable Clan Vharruk make — too heavy for the cult to move, too stubborn for thralls to bother.
Alarm. Lifting an axe triggers a pressure plate (Perception (Intelligence) 17 to notice). It doesn't open a pit; it rings a bell deep in the vaults. The party has roughly ten minutes before a response comes up the stairwell.
Bypass (room sheet). Wedge the plate or match the axe's weight.
No enemies at entry. If the alarm sounds, keep one countdown running across rooms. Response path: Room 5 → Room 4 → toward Room 3.
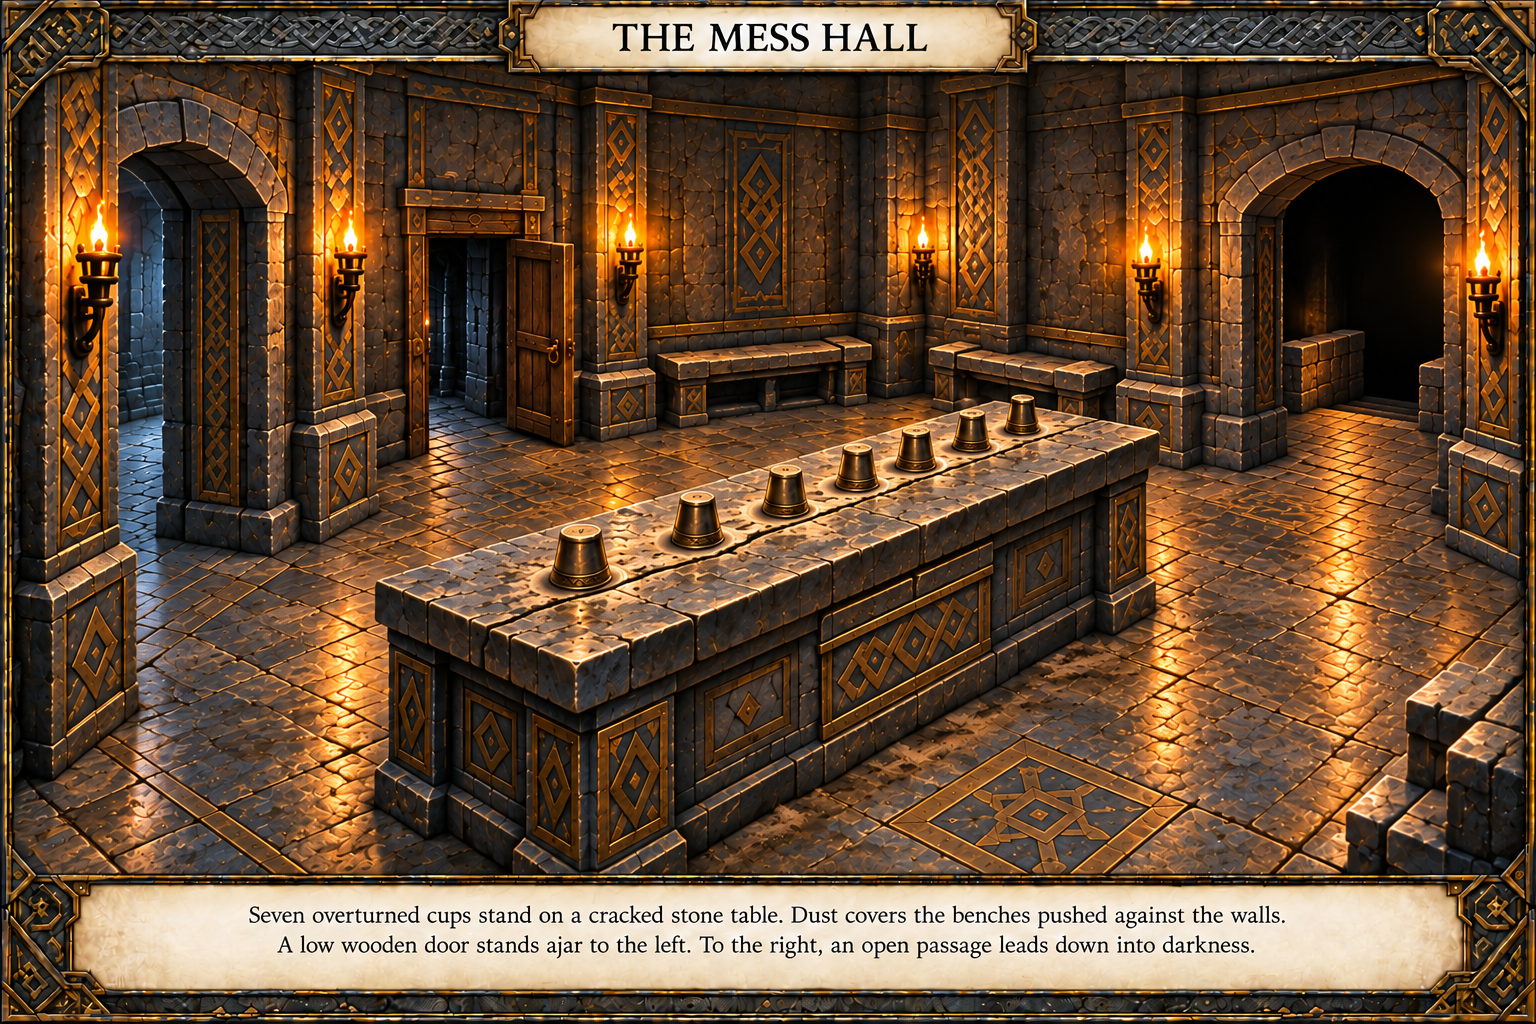
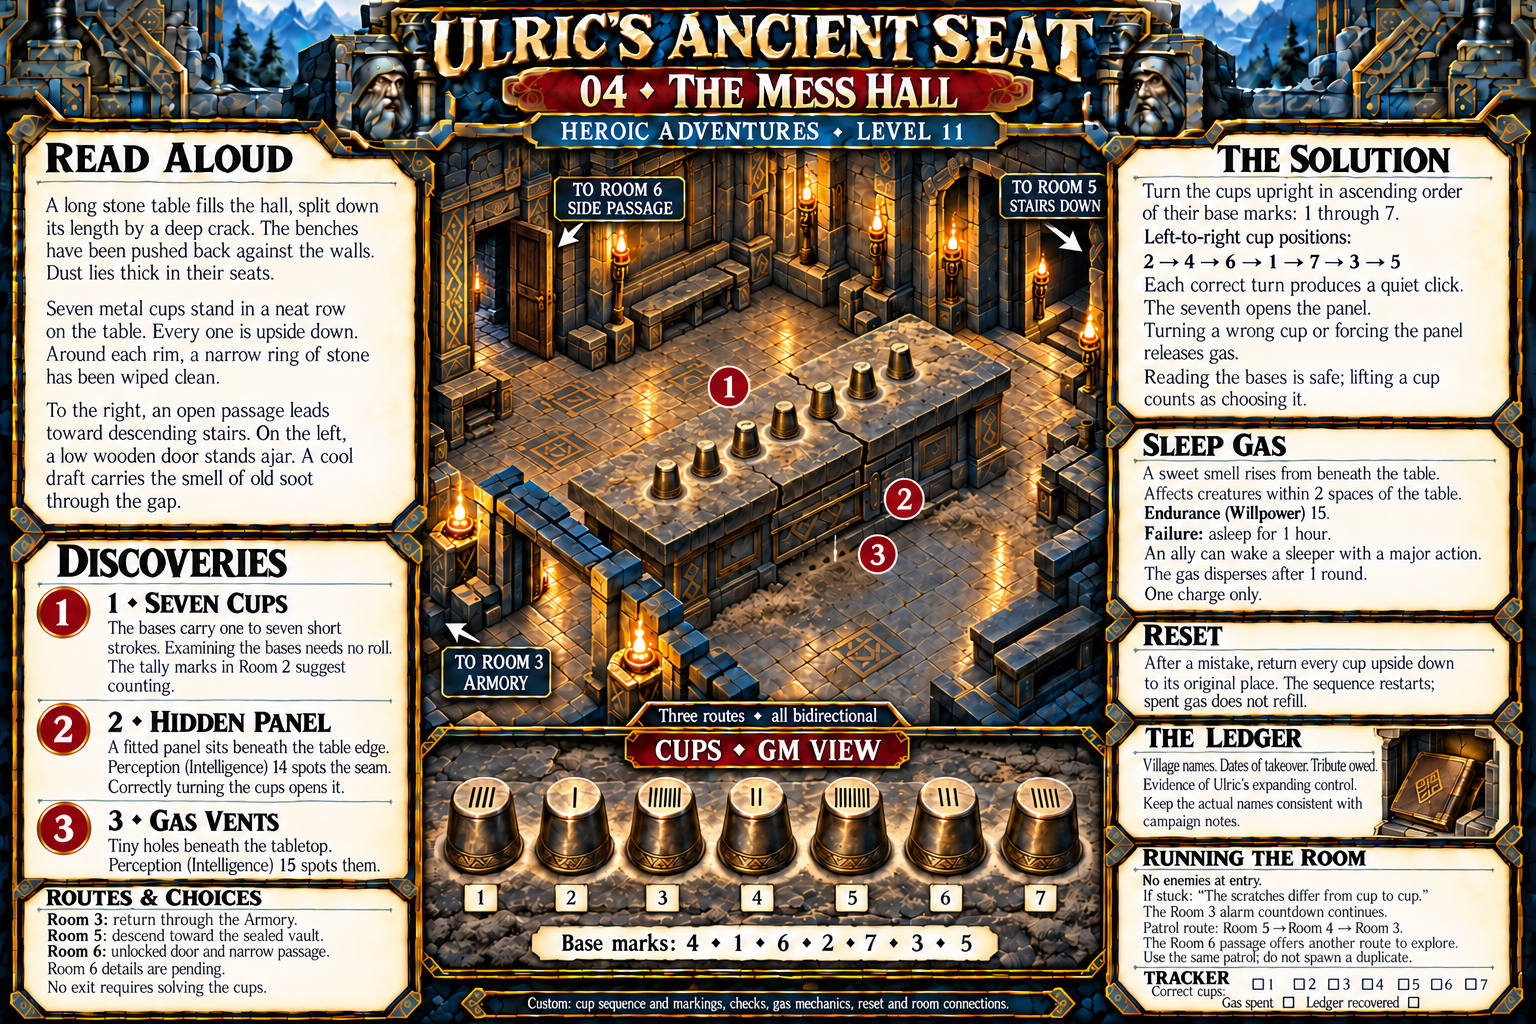
A long stone table fills the hall, split down its length by a deep crack. The benches have been pushed back against the walls. Dust lies thick on their seats.
Seven metal cups stand in a neat row on the table. Every one is upside down. Around each rim, a narrow ring of stone has been wiped clean.
To the right, an open passage leads toward descending stairs. On the left, a low wooden door stands ajar. A cool draft carries the smell of old soot through the gap.
DM notes
Ulric's signature — he doesn't drink anymore, but he keeps the ritual. The table conceals his ledger: names of every village taken, dates, and tribute owed. This is the party's best evidence of the takeover pattern.
No exit requires solving the cups. No enemies at entry. If the Room 3 alarm sounded, keep its countdown running and use the same response patrol if it arrives.
Cup puzzle
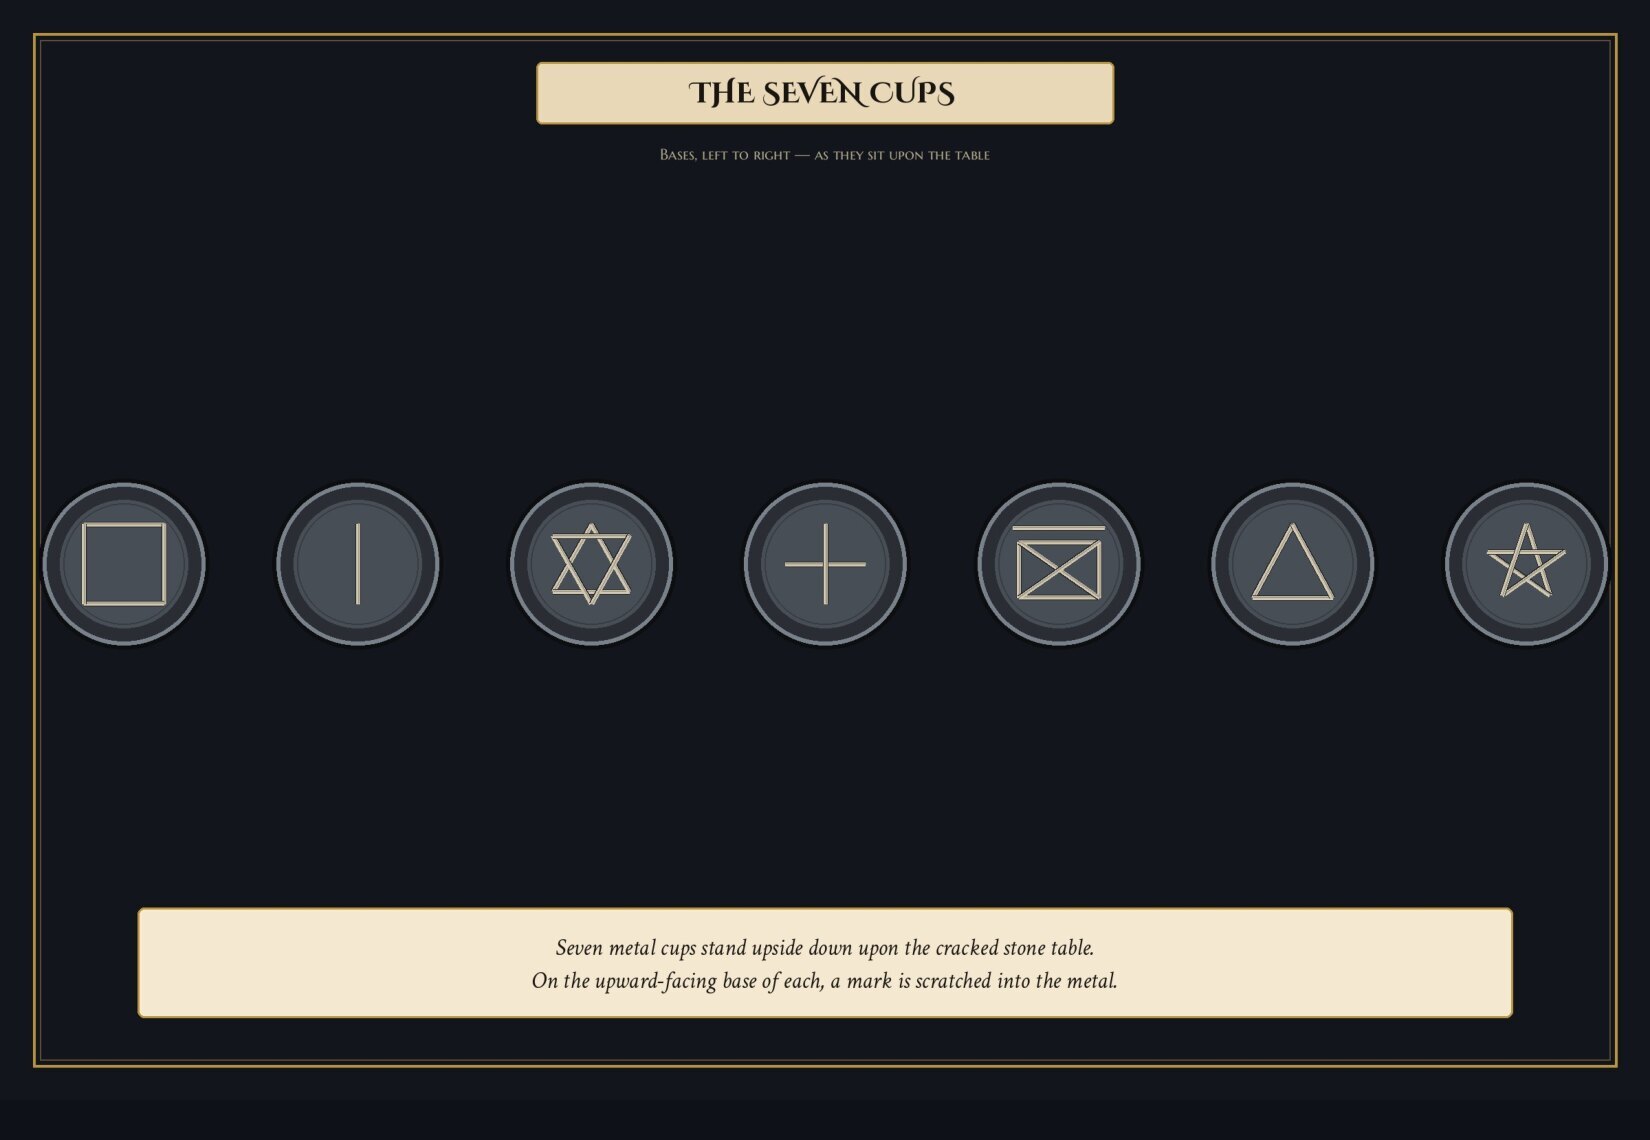
The upward-facing bases each carry a scratched symbol made of straight lines. Count the lines to read the value (1–7). Reading them requires no roll and does not trigger the trap.
Left to right on the table: square (4), stroke (1), hexagram (6), plus (2), roofed window (7), triangle (3), pentagram (5) — values 4, 1, 6, 2, 7, 3, 5.
Turn cups upright in ascending order of values — positions 2, 4, 6, 1, 7, 3, 5. Each correct turn clicks; the seventh opens the panel. Lifting a cup counts as choosing it. A wrong choice or forcing the panel releases gas.
Discovery. Perception (Intelligence) 14 reveals the panel seam; 15 reveals gas vents beneath the table.
Sleep gas. One charge, affecting creatures within 2 spaces of the table. Endurance (Willpower) 15; failure means sleep for one hour. An ally can wake a sleeper with a major action. Gas disperses after one round. Return every cup upside down to its original position to reset the sequence; spent gas does not refill.
If stuck, the tally wall in Room 2 suggests counting lines; point out that the scratches differ between cups.
GM symbol key
Value equals the number of straight line segments.
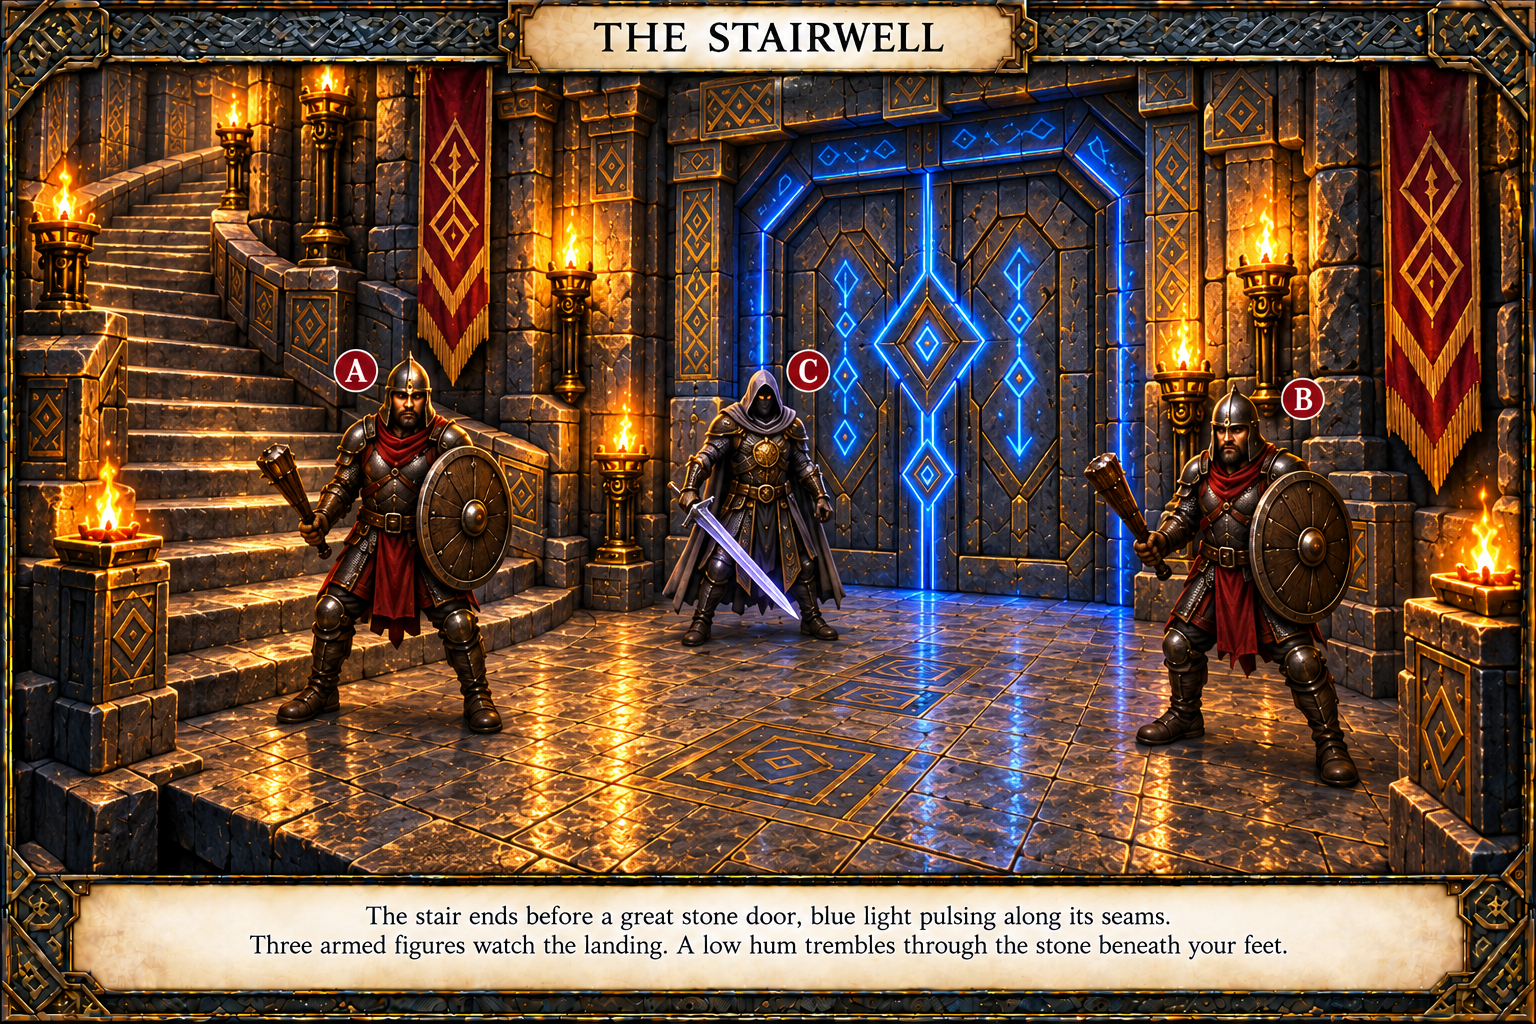
The stair curls down around a pillar of solid rock. Its treads are swept clean, but dust lies thick on the narrow ledges. A low hum rises through the soles of your boots. Below, blue light traces the edges of a great stone door. The air smells of cold iron and rain on stone.
At the table
Connections. Top of the spiral returns to Room 4. Bottom reaches a 6-by-5-space landing and the sealed vault door. Beyond the door, the lower vaults remain undeveloped.
Encounter (Level 11). Two thrall soldiers A/B (initiative 5) and one Glass Warden C (initiative 11). Without an alarm, A and B guard the landing; C stands visibly before the vault door holding a shardblade. They attack intruders entering the landing. With the Armory alarm active, these same three ascend toward Rooms 4 and 3 on the existing countdown. If already encountered, use only surviving members at their current locations and health. Never create a second patrol. Kitchen defenders are separate.
Terrain. Stair is 2 spaces wide around a solid stone core that blocks sight through it. Landing is 6 by 5 spaces. No automatic elevation advantage. The only upper exit returns to Room 4.
Thrall Soldiers A/B
Level 11 · Soldier · Initiative 5
Skill
5
Agility
3
Aim
4
Tactics
3
Intelligence
1
Willpower
4
Strength
4
Toughness
4
Block
2
Health
24
Damage
2d6+4
Move
6/2
Club and shield, Strike, Heroic 1. Fearless. Hold the foot of the stairs; do not block the party's return with new reinforcements.
Glass Warden C
Level 11 · Slayer · Initiative 11
Skill
7
Agility
7
Aim
4
Tactics
5
Intelligence
2
Willpower
2
Strength
5
Toughness
3
Block
0
Health
21
Damage
2d10+5
Move
6/2
Shardblade, Strike, Heroic 1. Waits behind the thralls, then attacks an exposed flank. The door's blue glow is not black-crystal light — Blurred Form and Shifting Light are inactive here.
Runed door
First bare-hand touch per creature deals 2d6 psychic damage; Willpower 16 halves it, rounded down. Regardless of result, the toucher sees one heartbeat of black crystal standing in rows around something vast and sleeping. Further touches by the same creature do not repeat the effect.
Opening. C carries a copper rune seal, visible on a chain. Pressing it to the matching door rune opens the door with a major action, no roll and no touch backlash. It can be taken from defeated C. If C was fought elsewhere, the seal travels with C. The door stays shut until deliberately opened. Opening does not define or trigger an additional encounter; prepare the lower vaults separately.
Discovery. The seal and matching rune are obvious on inspection; no roll. The swept stair indicates regular traffic.
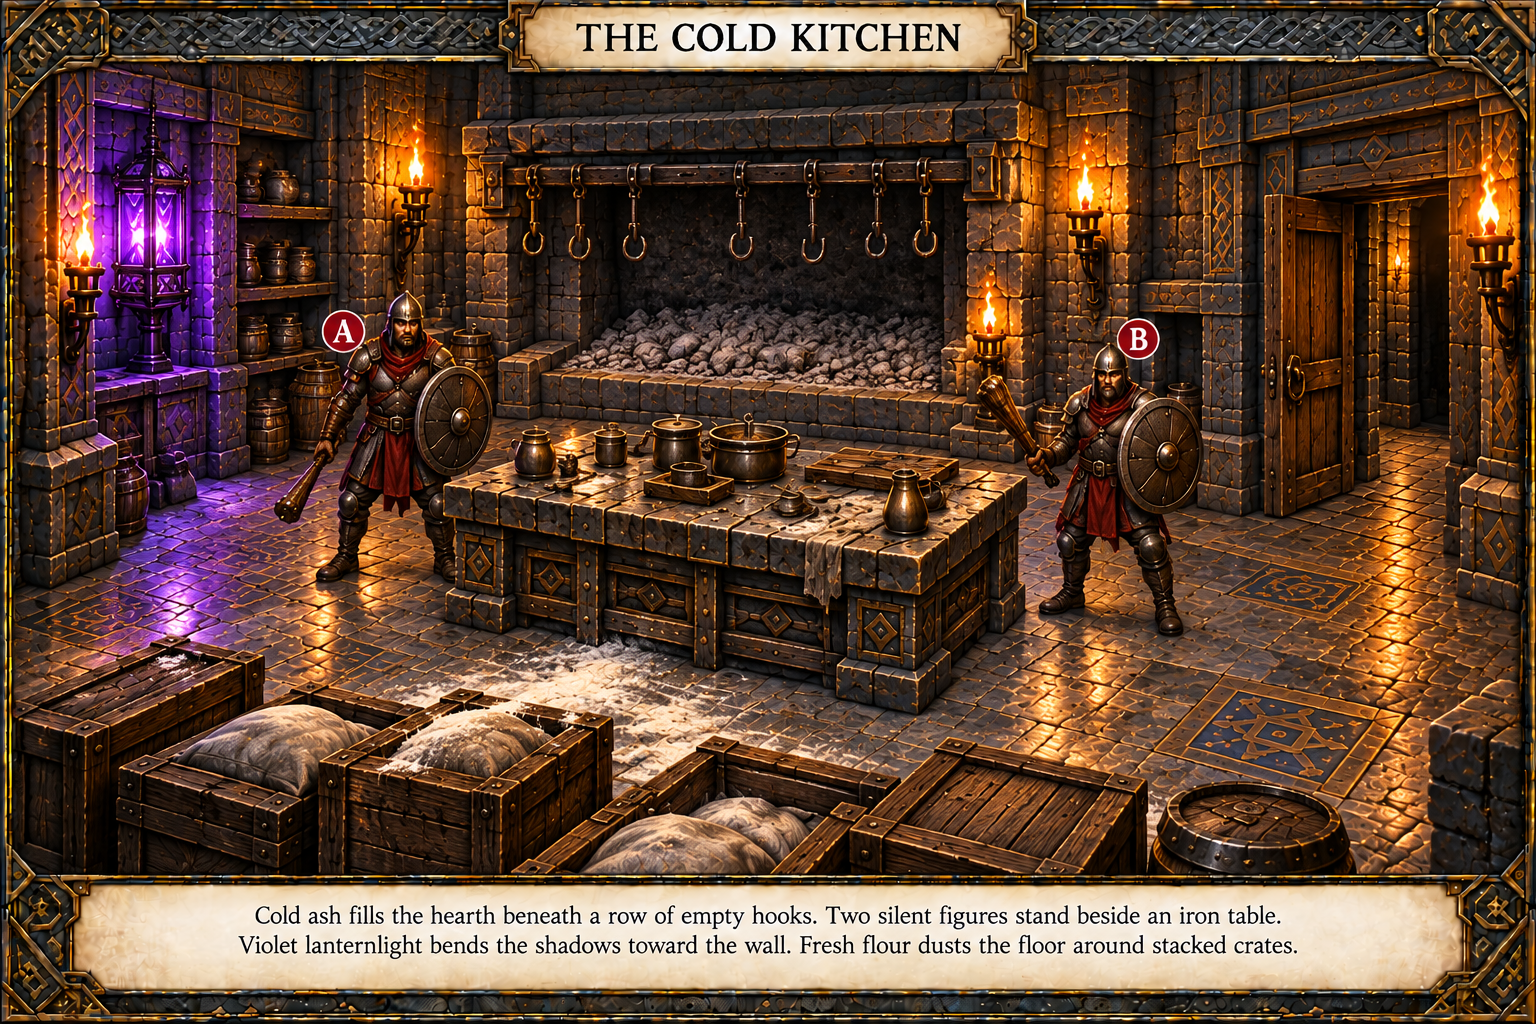
Cold ash fills a hearth wide enough to roast an ox. Above it, empty hooks hang from a soot-blackened beam. Two figures stand beside an iron preparation table, their hands resting on heavy clubs. Neither speaks. A lantern on the far wall casts a thin violet light, yet the shadows beneath the table lean toward it. Fresh flour whitens the floor around a stack of supply crates.
Layout
A 9-by-8-space chamber west of Room 4. One east-wall doorway returns through the narrow passage to the Mess Hall. Cold hearth on the north wall; iron preparation table in the center; supply crates on the south wall; black-crystal lantern on a west-wall bracket. The chimney is too narrow to traverse. Keep the doorway and aisles clear.
Encounter (Level 11)
A and B: two thrall soldiers, initiative 5. C: one Glass Warden slayer, initiative 11, concealed beside the west-wall lantern. Perception (Intelligence) 15 spots C before it attacks. A and B demand that visitors leave; they attack if anyone crosses the table's near edge or touches the supplies. C joins when combat starts. These are local defenders, not the Room 3 alarm patrol.
Thrall Soldiers A/B
Level 11 · Soldier · Initiative 5
Skill
5
Agility
3
Aim
4
Tactics
3
Intelligence
1
Willpower
4
Strength
4
Toughness
4
Block
2
Health
24
Damage
2d6+4
Move
6/2
Club and shield, Strike, Heroic 1. Fearless. Hold the aisles beside the table.
Glass Warden C
Level 11 · Slayer · Initiative 11
Skill
7
Agility
7
Aim
4
Tactics
5
Intelligence
2
Willpower
2
Strength
5
Toughness
3
Block
0
Health
21
Damage
2d10+5
Move
6/2
Shardblade, Strike, Heroic 1. Blurred Form: advantage on Agility defense in crystal light; direct light negates it. Shifting Light: bonus action, teleport up to 6 spaces between crystal-lit spaces. Attacks from the flank.
Lantern, supplies & running
Lantern. Its crystal light reaches the whole room. An adjacent creature can cover or extinguish it with a major action, no roll. Both Warden features cease while the lantern is covered or dark. Ordinary torchlight remains.
Supplies. Searching the crates finds 12 person-days of rations and dated delivery slips. The same villages appear in the Room 4 ledger. No roll required.
Running. The cold hearth is harmless. The table blocks movement through its footprint. Keep the existing Room 3 alarm countdown running; do not duplicate its patrol.
Player handoutGM sheet
Chapter VII
Running Ulric & GM Notes
Ulric does not fight to the death in his seat if he can avoid it. He'll bargain, flee, or send thralls first.
Breaking the shard shatters the link for good but makes him move faster.
Dow's sunburst amulet or Ragana's lantern blazed into the glass hurts him on his side and cuts the link for that night — and angers him.
The party exposed him in front of Avalryn's guards and cost him his place as the king's cousin. Personal revenge is on his list, right under his master's errand.
Do not resolve whether Lumel is present in the dungeon. The ash-in-the-well mark and the mirror backing suggest his touch, but he is patient and far. Let the party find evidence, not the man.
Cross-reference: Tower of Lumelel encounters (Courtly Shadows, Vampire on the Hunt, Illusion of Lumelel, Enchanted Halls) for what the party already knows about vampires and Lumel's methods.
Chapter VIII
Open Questions
Settle these before the party walks in — or leave them live and decide in play.
Sources: Notion pages Dungeon: Ulric's Ancient Seat, Ulric's Ancient Seat — Dungeon Detail, and Room 1 — Gate Hall GM Reference; plus the Room 01–06 player handouts, GM encounter sheets, and Level One dungeon map. Campaign: Heroes of Light.